
Hey guys, in this blog we will see how we can build OpenCV with Cuda and cuDNN support in Windows. The process of building OpenCV with Cuda can be very tricky and tedious if doing it for the very first time. So without any further due, let’s do it.
- These are the versions we will be installing.
- Opencv 4.5.5
- Opencv-contrib 4.5.5
- Visual Studio 2019
Step 0 – Uninstall Python and Anaconda.
- Although this is not an important step, it’s recommended for smooth installation.
- You need to uninstall previous installations of Python and Anaconda.
- Reinstall Anaconda from here.
- Install NumPy from the terminal using pip install numpy.
Step 1 – Download Cmake to build OpenCV with cuda

Step 2 – Download Visual Studio
- We will download Visual Studio 2019.
- Install “Desktop development with C++“.

RESTART YOUR COMPUTER…
Step 3 – Download OpenCV
- Download OpenCV – https://opencv.org/releases/
- Download Sources.

Step 4 – Download opencv-contrib
- Download opencv-contrib – https://github.com/opencv/opencv_contrib/tags
- Click on zip.

Step 5 – Extract files.
- Extract the OpenCV zip and OpenCV-contrib zip.
- Create an empty folder named build.

Step 6 – Run Cmake GUI.
- In Where is the source code, Select the main opencv extracted folder.
- In Where to build the binaries, Select the empty build folder we created above.

- Click on the Configure button.
- I have Visual Studio 2019 installed, so I selected Visual Studio 16 2019.
- In the Optional platform for the generator, select x64.

- Click on Finish and it will start configuring.
- Once done you will see a screen like this.

Now search the following…
- WITH_CUDA and tick/check it.

- OPENCV_DNN_CUDA and tick/check it.

- ENABLE_FAST_MATH and tick/check it.

- OPENCV_EXTRA_MODULES_PATH and browse to the module folder in opencv-contrib we extracted in step 5.

- And now again hit on the Configure button.

- Once you see, Configuring done, check CUDA_FAST_MATH also.

- Now go to this link and check your compute capability against your graphic card.
- Mine is Nvidia GTX 1050Ti, so my arch is 6.1.

- In the CMake window, search for CUDA_ARCH_BIN.
- You will see something like this.

- Delete all values except your Compute Capability.

- Again hit on the Configure button for the final time.
- Once done, finally hit the Generate button.

- Now you will see a lot of files in your build folder.

Step 7 – Build OpenCV with CUDA
- We will have a file like this OpenCV.sln.

- Now open the CMD Terminal in Administrator mode from the start menu.
- Change the directory to your build folder using cd command and run OpenCV.sln.
- It will open up Visual Studio.

- Once Visual Studio is opened, change Debug to Release.


- Now in the right sidebar, open the CMake Targets dropdown and you will see ALL_BUILD.
- Right click on it and select build and it will start building our binaries.
- This process will take some time.

- Once done it will prompt this.
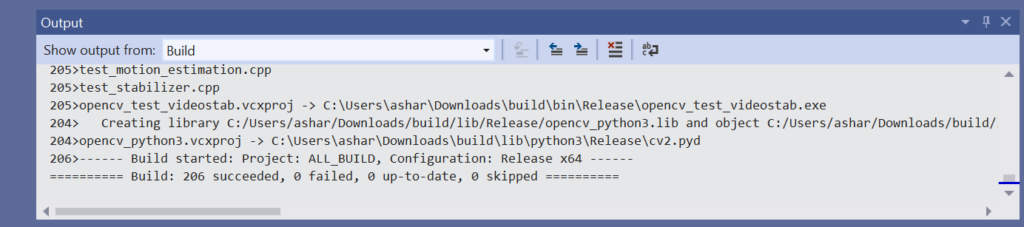
- Now right click on INSTALL and build.

Step 8 – Check OpenCV Installation.
- Congratulations, you have successfully installed OpenCV with Cuda support.
- Now let’s check if python is detecting cv2 or not.
- Open cmd and paste the following commands.
python
import cv2
cv2.__version__
cv2.cuda.getCudaEnabledDeviceCount()

- Now let’s check if cv2 is detecting CUDA or not.
- Create a test.py file and paste the following code in it and run it.
import numpy as np
import cv2 as cv
import time


npTmp = np.random.random((1024, 1024)).astype(np.float32)

npMat1 = np.stack([npTmp,npTmp],axis=2)
npMat2 = npMat1

cuMat1 = cv.cuda_GpuMat()
cuMat2 = cv.cuda_GpuMat()
cuMat1.upload(npMat1)
cuMat2.upload(npMat2)
start_time = time.time()
cv.cuda.gemm(cuMat1, cuMat2,1,None,0,None,1)
print("CUDA --- %s seconds ---" % (time.time() - start_time))
start_time = time.time()

cv.gemm(npMat1,npMat2,1,None,0,None,1)
print("CPU --- %s seconds ---" % (time.time() - start_time))

NOTE – If you are facing the below error while running cv2, follow these steps.

- Download zlib123dllx64.zip, extract it in a folder, and copy the path to the folder where zlibwapi.dll file is located.
- I extracted it in the opencv_build folder, you can extract it anywhere else also.

- Now open the start menu and search env, then open “Edit the system Environment Variable”, click on Environment Variables…, then double click on the Path under the System variables Section.
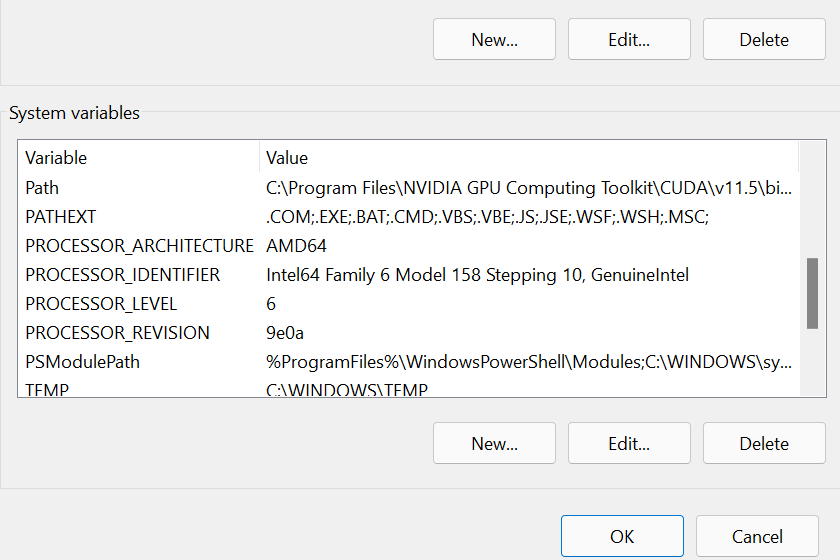
- Click on New and paste the path you copied above.

- And then simply click OK, OK and OK.
And now everything should work like a charm!!!
Conclusion
In conclusion, building OpenCV with CUDA and cuDNN support on Windows opens up a world of possibilities for accelerating image processing and deep learning tasks. By harnessing the power of NVIDIA GPUs, developers can leverage CUDA-accelerated functions and cuDNN optimizations to achieve significant performance improvements.
So this is how you can build OpenCV with CUDA and cuDNN support in Windows, thanks for reading it and I hope you are taking something with you after reading this and till the next time…
FAQs
Can I use any version of the CUDA Toolkit and cuDNN with OpenCV?
OpenCV versions may have specific requirements for CUDA Toolkit and cuDNN versions. It’s recommended to check the compatibility matrix provided by OpenCV documentation to ensure compatibility between versions.
What if I encounter errors during the configuration or build process?
If you encounter errors during the configuration or build process, carefully review the error messages to identify the issue. Common issues include missing dependencies, incorrect paths to CUDA Toolkit or cuDNN, or incompatible Visual Studio versions.
Do I need a compatible NVIDIA GPU to use CUDA-accelerated functions in OpenCV?
Yes, CUDA-accelerated functions in OpenCV require a compatible NVIDIA GPU. Make sure your GPU meets the requirements specified by the CUDA Toolkit and OpenCV documentation.
Can I build OpenCV with CUDA and cuDNN support on a Windows virtual machine?
Building OpenCV with CUDA and cuDNN support on a Windows virtual machine may encounter limitations due to virtualization technologies. It’s recommended to use a physical Windows machine with a compatible NVIDIA GPU for optimal performance.
Is there a pre-built package of OpenCV with CUDA and cuDNN support available for Windows?
Some third-party distributions of OpenCV may provide pre-built packages with CUDA and cuDNN support for Windows. However, it’s essential to verify the compatibility and reliability of such packages before using them in production environments.
Check out my other machine learning projects, deep learning projects, computer vision projects, NLP projects, Flask projects at machinelearningprojects.net


![[Latest] 15+ Best Python Mini Projects – 2026](https://machinelearningprojects.net/wp-content/uploads/2023/05/best-python-mini-projects-1024x536.webp)

Can I delete the build folder after install? it’s taking up a lot of space (20GB) and I don’t have that much space. It doesn’t seem that important after installation because if I install the non-cuda OpenCV it doesn’t take up that much space and I doubt that Cuda support is that big.
Although I am not sure about that, you can try this…
Move that folder to a Pen Drive or a Hard disk and see if cv2 is running properly.
If it’s running properly, then you are good to go else move that folder back to its place.
Hi!!!
As I am trying to build in virtual studio, it is showing many as failed. Errors are showing LNK1181 and MSB8066. In total 133 errors. I am not sure what to do. Can you please help me with this?
Try lower versions of CUDA and cuDNN. Try CUDA 10.0 and compatible cuDNN version once.
I succesfully compiled “All_Build”, then right click on INSTALL and build.
Got msg :
ending with …..
1>– Installing: C:/CV2-4.7.0/build/install/x64/vc17/bin/opencv_version_win32.exe
1>– Installing: C:/CV2-4.7.0/build/install/x64/vc17/bin/opencv_model_diagnostics.exe
========== Build: 1 succeeded, 0 failed, 207 up-to-date, 0 skipped ==========
========== Build completed at 23:42 and took 03,515 seconds ==========
But can not make it to work 🙁
, got msg : ModuleNotFoundError: No module named ‘cv2’
Please help.
Fabs, did you find the solution ? I have the same problem, there must be something missing, it just create files in the install build folder but how can python use them ??