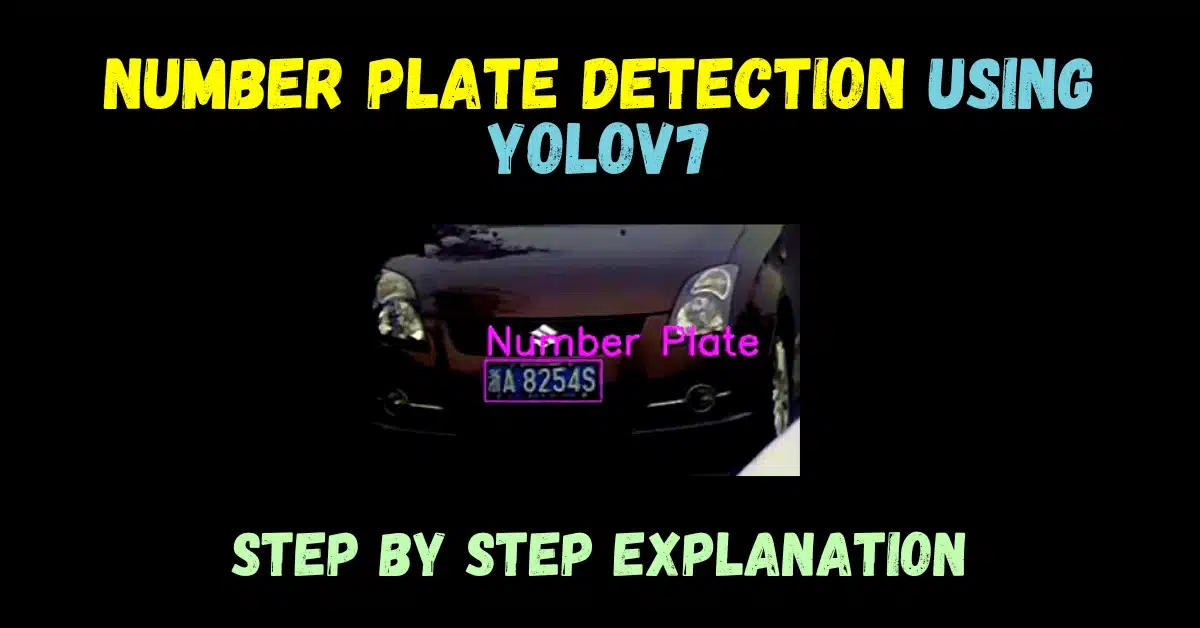
Hey guys, in this blog we will see how to perform Number Plate Detection using YOLOv7 by training the YOLOv7 on our custom number plate data.
YOLOv7 is the new state-of-the-art real-time object detection model.
You can use it for different industrial applications. Also, you can optimize the model, that is, converting the model to ONNX, TensorRT, etc, which will increase the throughput and run the edge devices.

In this blog, we will see the step-by-step guide to Train YOLOv7 on our custom dataset.
So without any further due, let’s do it…
Sneak at our Number Plate Detection using Yolov7
Step 1 – Collect Number Plate Dataset
- I basically used 2 datasets for the training purpose.
- Dataset 1 – Indian vehicle number plate yolo annotation
- Dataset 2 – Car Number Plate Detection
- Dataset 1 is already present with YOLO Annotations.
- But for Dataset 2, you will have to annotate it.
- For an easier Annotation process, you can install the ‘labelImg’ python package.
pip install labelImg
- After installing the package, open the terminal and run the ‘labelImg’ command.
- It will open up a GUI.
- Select the Image directory in it. The image Directory is where all Images are stored that you want to annotate.
- Change Save dir in it. Save Director is where it will store the annotations.
- Finally, make sure the format is set to YOLO and not to PascalVOC.
Step 2 – Let’s Train YOLOv7 on our custom Dataset
- Till this step you should have 2 folders; images and labels.
- The images folder should have all the Images and the labels folder should have all the Annotations in the txt format.
- If you have not seen my previous blog on custom training a YOLOv7, do please check it out.
Easiest way to Train YOLOv7 on the custom dataset
- When you will train YOLOv7 on the number plate dataset, you will get a PyTorch weight file in “.pt” format.
- That is the most important file we need for the inference.
Step 3 – Inference on Images and Videos
Inference on Image File
- Following is the code for Inference on an Image file.
- In Line 15 we have loaded the PyTorch weight file.
- In Line 20 we have given the Video File path.
# Number Plate Detection using Yolov7

import matplotlib.pyplot as plt
import torch
import cv2
import numpy as np
import time

from torchvision import transforms
from utils.datasets import letterbox
from utils.general import non_max_suppression_kpt
from utils.plots import output_to_keypoint, plot_skeleton_kpts

device = torch.device("cuda:0" if torch.cuda.is_available() else "cpu")
weigths = torch.load('best.pt')
model = weigths['model']
model = model.half().to(device)
_ = model.eval()

img_path = '1.jpg'

img = cv2.imread(img_path)

# Get the frame width and height.
h,w,c = img.shape
frame_width = w
frame_height = h


orig_image = img
image = cv2.cvtColor(orig_image, cv2.COLOR_BGR2RGB)
image = letterbox(image, (frame_width), stride=64, auto=True)[0]
image_ = image.copy()
image = transforms.ToTensor()(image)
image = torch.tensor(np.array([image.numpy()]))
image = image.to(device)
image = image.half()

with torch.no_grad():
    output, _ = model(image)

output = non_max_suppression_kpt(output, 0.25, 0.65, nc=model.yaml['nc'], kpt_label=True)
output = output_to_keypoint(output)
nimg = image[0].permute(1, 2, 0) * 255
nimg = nimg.cpu().numpy().astype(np.uint8)
nimg = cv2.cvtColor(nimg, cv2.COLOR_RGB2BGR)
for idx in range(output.shape[0]):
    # plot_skeleton_kpts(nimg, output[idx, 7:].T, 3)

    # Comment/Uncomment the following lines to show bounding boxes around persons.
    xmin, ymin = (output[idx, 2]-output[idx, 4]/2), (output[idx, 3]-output[idx, 5]/2)
    xmax, ymax = (output[idx, 2]+output[idx, 4]/2), (output[idx, 3]+output[idx, 5]/2)

    plate_roi = nimg[int(ymin):int(ymax),int(xmin):int(xmax)]
    cv2.imshow('Plate',plate_roi)

    cv2.putText(nimg, "Number Plate", (int(xmin), int(ymin)-5), cv2.FONT_HERSHEY_SIMPLEX,1, (228, 79, 215), 2)
    cv2.rectangle(
        nimg,
        (int(xmin), int(ymin)),
        (int(xmax), int(ymax)),
        color=(228, 79, 215),
        thickness=1,
        lineType=cv2.LINE_AA
    )

# Convert from BGR to RGB color format.
cv2.imwrite('result.jpg',nimg)
Result

- Our model is performing well on this Image.
- Both the number plates of the car and truck are detected successfully.
- Although it is detecting some noise also, to avoid this we can train it on even more data and on more epochs.
Inference on Video File
- Following is the code for Inference on a video file.
- In Line 15 we have loaded the PyTorch weight file.
- In Line 20 we have given the Video File path.
# Number Plate Detection using Yolov7

import matplotlib.pyplot as plt
import torch
import cv2
import numpy as np
import time

from torchvision import transforms
from utils.datasets import letterbox
from utils.general import non_max_suppression_kpt
from utils.plots import output_to_keypoint, plot_skeleton_kpts

device = torch.device("cuda:0" if torch.cuda.is_available() else "cpu")
weigths = torch.load('best.pt')
model = weigths['model']
model = model.half().to(device)
_ = model.eval()

video_path = '1.mp4'

cap = cv2.VideoCapture(video_path)
if (cap.isOpened() == False):
  print('Error while trying to read video. Please check path again')

# Get the frame width and height.
frame_width = int(cap.get(3))
frame_height = int(cap.get(4))

# Pass the first frame through `letterbox` function to get the resized image,
# to be used for `VideoWriter` dimensions. Resize by larger side.
vid_write_image = letterbox(cap.read()[1], (frame_width), stride=64, auto=True)[0]
resize_height, resize_width = vid_write_image.shape[:2]

# Define codec and create VideoWriter object .
out = cv2.VideoWriter("result.mp4",
                    cv2.VideoWriter_fourcc(*'mp4v'), 30,
                    (resize_width, resize_height))


frame_count = 0 # To count total frames.
total_fps = 0 # To get the final frames per second.


while(cap.isOpened):
  # Capture each frame of the video.
  ret, frame = cap.read()
  if ret:
      orig_image = frame
      image = cv2.cvtColor(orig_image, cv2.COLOR_BGR2RGB)
      image = letterbox(image, (frame_width), stride=64, auto=True)[0]
      image_ = image.copy()
      image = transforms.ToTensor()(image)
      image = torch.tensor(np.array([image.numpy()]))
      image = image.to(device)
      image = image.half()

      # Get the start time.
      start_time = time.time()
      with torch.no_grad():
          output, _ = model(image)
        # Get the end time.
      end_time = time.time()
      # Get the fps.
      fps = 1 / (end_time - start_time)
      # Add fps to total fps.
      total_fps += fps
      # Increment frame count.
      frame_count += 1

      output = non_max_suppression_kpt(output, 0.25, 0.65, nc=model.yaml['nc'], kpt_label=True)
      output = output_to_keypoint(output)
      nimg = image[0].permute(1, 2, 0) * 255
      nimg = nimg.cpu().numpy().astype(np.uint8)
      nimg = cv2.cvtColor(nimg, cv2.COLOR_RGB2BGR)
      for idx in range(output.shape[0]):
          # plot_skeleton_kpts(nimg, output[idx, 7:].T, 3)

          # Comment/Uncomment the following lines to show bounding boxes around persons.
          xmin, ymin = (output[idx, 2]-output[idx, 4]/2), (output[idx, 3]-output[idx, 5]/2)
          xmax, ymax = (output[idx, 2]+output[idx, 4]/2), (output[idx, 3]+output[idx, 5]/2)

          plate_roi = nimg[int(ymin):int(ymax),int(xmin):int(xmax)]
          cv2.imshow('Plate',plate_roi)

          cv2.putText(nimg, "Number Plate", (int(xmin), int(ymin)-5), cv2.FONT_HERSHEY_SIMPLEX,1, (228, 79, 215), 2)
          cv2.rectangle(
              nimg,
              (int(xmin), int(ymin)),
              (int(xmax), int(ymax)),
              color=(228, 79, 215),
              thickness=1,
              lineType=cv2.LINE_AA
          )

      # Write the FPS on the current frame.
      cv2.putText(nimg, f"{fps:.3f} FPS", (15, 30), cv2.FONT_HERSHEY_SIMPLEX,
                  1, (0, 255, 0), 2)
      # Convert from BGR to RGB color format.
      cv2.imshow('image', nimg)
      out.write(nimg)
      print(f"{fps:.3f} FPS")
      # Press `q` to exit.
      if cv2.waitKey(1) & 0xFF == ord('q'):
          break
  else:
      break
# Release VideoCapture().
cap.release()
# Close all frames and video windows.
cv2.destroyAllWindows()
# Calculate and print the average FPS.
avg_fps = total_fps / frame_count
print(f"Average FPS: {avg_fps:.3f}")
Result
NOTE – If you want to run these inference files, save these files in the cloned yolo folder because these files use some util functions that are present in the yolo folder.
Clone the yolo repo using the command below:
git clone https://github.com/WongKinYiu/yolov7.git
So in this way you can Train YOLOv7 on the custom dataset in the easiest way possible.
In this blog, I have explained everything step-by-step on how you can Train a number plate detector using YOLOv7 and by simply following these steps you can do it.
About Source Code
But still, if you want everything ‘Done For You’ and everything setup, you can buy it by paying a minimalistic fee of ₹500, Send me the payment screenshot at asharma70420@gmail.com
The following things will be provided in the package:
- Trained YOLOv7 weights for Number Plate Detection.
- Annotated Data.
- Inference Scripts that you can use according to your need.
- Video Files.
You can Pay using the button below…
Check out my other machine learning projects, deep learning projects, computer vision projects, NLP projects, and Flask projects at machinelearningprojects.net


i need projects in tensorflow