So guys in today’s blog we will be building an Emotion Detector model in Keras using Convolutional Neural Networks. This is one of my favorite projects, and that’s why I am very excited to start with it, so without any further due, Let’s do it…
Step 1 – Importing required libraries for Emotion Detector.
from keras.preprocessing.image import ImageDataGenerator
from keras.layers import Dense,Dropout,Activation,Conv2D,MaxPooling2D,BatchNormalization,Flatten
from keras.models import Sequential
from keras.optimizers import rmsprop_v2
from keras.callbacks import EarlyStopping,ReduceLROnPlateau,ModelCheckpoint
from keras.models import load_model
import cv2
from PIL import Image
import numpy as np
import pandas as pd
import os
from keras.utils.np_utils import to_categorical
import seaborn as sns
Step 2 – Reading all images and storing them in a dataframe.
int2emotions = {0:'Angry',1:'Fear',2:'Happy',3:'Neutral',4:'Sad',5:'Surprise'}
emotions2int = {'Angry':0,'Fear':1,'Happy':2,'Neutral':3,'Sad':4,'Surprise':5}
dic = {'images':[], 'labels':[], 'purpose':[]}
for d in os.listdir('fer2013/'):
print(d)
for emotion in os.listdir(f'fer2013/{d}'):
print(emotion)
for i in os.listdir(f'fer2013/{d}/{emotion}'):
img = cv2.imread(f'fer2013/{d}/{emotion}/{i}',0)
img = img.reshape(48,48,1)
dic['images'].append(img)
dic['labels'].append(emotion)
if d=='train':
dic['purpose'].append('T')
else:
dic['purpose'].append('V')
df = pd.DataFrame(dic)
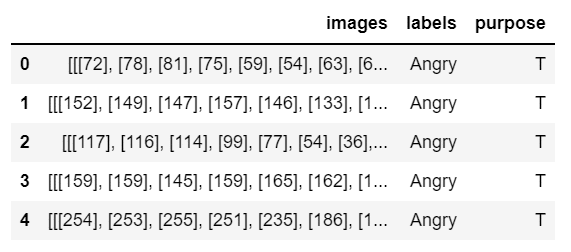
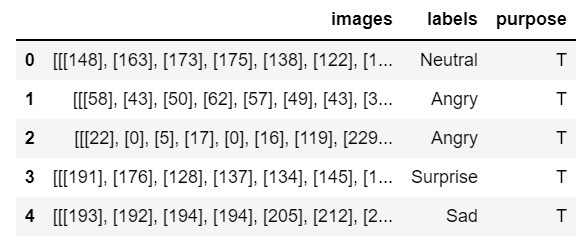
df.head()
- Here we are simply reading our data and storing it in a pandas dataframe.
- Images contain images with the shape 48X48X1.
- Labels depict the emotion of that image.
- Purpose has 2 values T and V. T is for training and V for validation.

Step 3 – Extracting training data and validation data.
train_data = df[df['purpose']=='T']
val_data = df[df['purpose']=='V']
- Creating 2 different data frames.
- First for the training and second for validation.
Check the head of training data.
train_data.head()
Check the head of validation data.
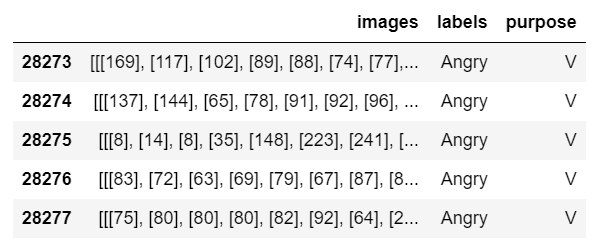
val_data.head()
Step 4 – Check values in the labels column of train data.
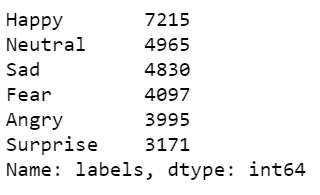
train_data['labels'].value_counts()
- As we can see in the image below that the labels are very unbalanced in the training data so we will balance them in the next step.
Step 5 – Taking equal instances of all classes.
happy_df = train_data[train_data['labels']=='Happy'].sample(n=3171)
neutral_df = train_data[train_data['labels']=='Neutral'].sample(n=3171)
sad_df = train_data[train_data['labels']=='Sad'].sample(n=3171)
fear_df = train_data[train_data['labels']=='Fear'].sample(n=3171)
angry_df = train_data[train_data['labels']=='Angry'].sample(n=3171)
surprise_df = train_data[train_data['labels']=='Surprise'].sample(n=3171)

train_data = pd.concat([happy_df,neutral_df,sad_df,fear_df,angry_df,surprise_df])

train_data = train_data.sample(frac=1)
train_data.reset_index(inplace=True)
train_data.drop('index',inplace=True,axis=1)

train_data.head()
- Here we are taking 3171 instances of every emotion ad contacting them to make one final dataframe.
Step 6 – Again check values in the labels column of train data.
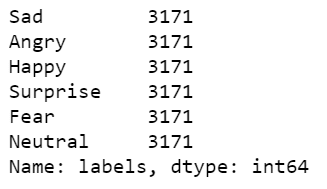
train_data['labels'].value_counts()
- Now again checking the counts and now we can see that all the classes are balanced.
Plotting the column.
sns.countplot(train_data['labels'])

Step 7 – Declaring some constants.
batch_size= 32
classes = 6
rows,columns=48,48
Step 8 – Getting data for the Emotion Detector model in the right shape.
train_labels = list(train_data['labels'].replace(emotions2int))
train_labels = to_categorical(train_labels)

val_labels = list(val_data['labels'].replace(emotions2int))
val_labels = to_categorical(val_labels)

train_data = list(train_data['images'])
train_data = np.array(train_data)

val_data = list(val_data['images'])
val_data = np.array(val_data)
- Line 1-2 – Convert emotions to ints like Angry to 0, Fear to 1, and so on, and then convert these numbers to one-hot encoded using to_categorical. This is for train data.
- Line 4-5 – Doing the same as above for validation data.
- Line 7-8 – Converting image column to list and then to a NumPy array for training purposes because we will not be using dataframe columns for training purposes, hence we will convert them to arrays.
- Line 10-11 – Doing the same as above for validation data.
Checking training data shape.
train_data.shape

Checking validation data shape.
val_data.shape

Step 9 – Creating the Emotion Detector model.
model = Sequential()

# First Block
model.add(Conv2D(64,(3,3),activation='elu',input_shape=(rows,columns,1),kernel_initializer='he_normal',padding='same'))
model.add(BatchNormalization())
model.add(Conv2D(64,(3,3),activation='elu',input_shape=(rows,columns,1),kernel_initializer='he_normal',padding='same'))
model.add(BatchNormalization())
model.add(MaxPooling2D(pool_size=(2,2)))
model.add(Dropout(0.2))

# Second Block
model.add(Conv2D(128,(3,3),activation='elu',kernel_initializer='he_normal',padding='same'))
model.add(BatchNormalization())
model.add(Conv2D(128,(3,3),activation='elu',kernel_initializer='he_normal',padding='same'))
model.add(BatchNormalization())
model.add(MaxPooling2D(pool_size=(2,2)))
model.add(Dropout(0.2))

# Third Block
model.add(Conv2D(256,(3,3),activation='elu',kernel_initializer='he_normal',padding='same'))
model.add(BatchNormalization())
model.add(Conv2D(256,(3,3),activation='elu',kernel_initializer='he_normal',padding='same'))
model.add(BatchNormalization())
model.add(MaxPooling2D(pool_size=(2,2)))
model.add(Dropout(0.2))

# Fourth Block
model.add(Conv2D(512,(3,3),activation='elu',kernel_initializer='he_normal',padding='same'))
model.add(BatchNormalization())
model.add(Conv2D(512,(3,3),activation='elu',kernel_initializer='he_normal',padding='same'))
model.add(BatchNormalization())
model.add(MaxPooling2D(pool_size=(2,2)))
model.add(Dropout(0.2))

# Fifth Block
model.add(Flatten())
model.add(Dense(256,activation='elu',kernel_initializer='he_normal'))
model.add(BatchNormalization())
model.add(Dropout(0.5))

# Sixth Block
model.add(Dense(128,activation='elu',kernel_initializer='he_normal'))
model.add(BatchNormalization())
model.add(Dropout(0.5))

# Seventh Block
model.add(Dense(64,activation='elu',kernel_initializer='he_normal'))
model.add(BatchNormalization())
model.add(Dropout(0.5))

# Eighth Block
model.add(Dense(classes,activation='softmax',kernel_initializer='he_normal'))

print(model.summary())
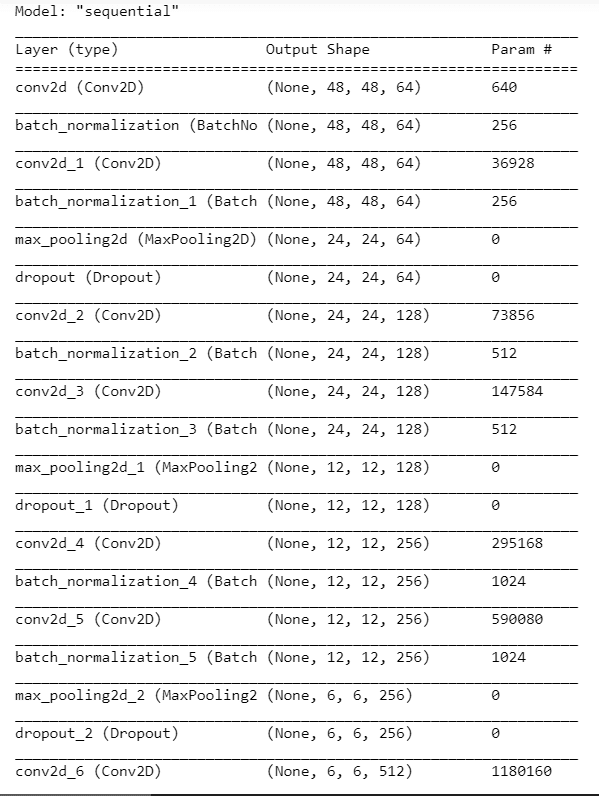
- Creating our Convolutional Neural Network model.
- Creating 4 blocks of Conv2D – BatchNormalization – Conv2D – BatchNormalization – MaxPooling2D – Dropout layers.
- Creating 3 blocks of Dense – Batch – Dropout layers and finally creating 1 Dense layer having 6 neurons/nodes.
Step 10 – Declaring callbacks.
checkpoint = ModelCheckpoint('model\\6_class_emotion_detector_V2.h5',
                             save_best_only=True,
                             mode='min',
                             monitor='val_loss',
                             verbose=1)

earlystopping = EarlyStopping(patience=10,
                             verbose=1,
                             min_delta=0,
                             monitor='val_loss',
                             restore_best_weights=True)


callbacks = [checkpoint, earlystopping]

model.compile(metrics=['accuracy'],
             optimizer='rmsprop',
             loss='categorical_crossentropy')
- Creating EarlyStopping and Checkpoint callbacks.
Step 11 – Training the model.
train_samples = 28273
validation_samples = 3534
batch_size = 64
epochs=30

history = model.fit(train_data,
                    train_labels,
                    epochs=epochs,
                    steps_per_epoch=train_samples//batch_size,
                    validation_data=(val_data,val_labels),
                    validation_steps=validation_samples//batch_size,
                    callbacks=callbacks)
- Finally training the model.

Step 12 – Live Prediction.
import cv2
from keras.models import load_model
import numpy as np

int2emotions = {0:'Angry',1:'Fear',2:'Happy',3:'Neutral',4:'Sad',5:'Surprise'}
model = load_model('model\\6_class_emotion_detector_V2.h5')
cap = cv2.VideoCapture(0)

classifier = cv2.CascadeClassifier('Haarcascades\\haarcascade_frontalface_default.xml')

def detect_face(frame):
    faces=classifier.detectMultiScale(frame,1.3,4)
    if faces==():
        return frame
    for x,y,w,h in faces:
        cv2.rectangle(frame,(x,y),(x+w,y+h),(172,42,251),2)
        face = frame[y:y+h,x:x+w]
        face = cv2.cvtColor(face,cv2.COLOR_BGR2GRAY)
        face = cv2.resize(face,(48,48))
        face = face.reshape(1,48,48,1)
        cv2.putText(frame,text=int2emotions[np.argmax(model.predict(face))],
                    org=(x,y-15),fontFace=cv2.FONT_HERSHEY_SIMPLEX,fontScale=1,color=(106,40,243),thickness=2)
    return frame

while 1:
    ret,frame= cap.read()
    if ret==True:
        cv2.imshow('emotion_detector',detect_face(frame))
        if cv2.waitKey(1)==27:
            break
cap.release()
cv2.destroyAllWindows()
Download Source Code for Emotion Detector…
Download Data for Emotion Detector…
NOTE – When you download the data just change the test folder name to validation.
Do let me know if there’s any query regarding Emotion Detector by contacting me on email or LinkedIn.
So this is all for this blog folks, thanks for reading it and I hope you are taking something with you after reading this and till the next time ?…
Read my previous post: MONKEY BREED CLASSIFICATION USING TRANSFER LEARNING
Check out my other machine learning projects, deep learning projects, computer vision projects, NLP projects, Flask projects at machinelearningprojects.net.