In today’s blog, we will be using Transfer learning to implement our today’s project which is Monkey Breed Classification. Transfer Learning is simply when we are using an already trained model for our current use case.
In this case, we will be using Mobilenet, pre-trained on Imagenet. So without any further due, Let’s do it…
Step 1 – Importing required libraries for Monkey Breed Classification.
from tensorflow.keras.applications.mobilenet import MobileNet
from tensorflow.keras.layers import Dense,Dropout,GlobalAveragePooling2D,Conv2D,MaxPooling2D,Activation
from tensorflow.keras.models import Model
from tensorflow.keras.preprocessing.image import ImageDataGenerator
from tensorflow.keras.callbacks import EarlyStopping,ModelCheckpoint
from tensorflow.keras.optimizers import RMSprop
Step 2 – Instantiating Mobilenet with Imagenet weights.
height = 224
width = 224
mobilenet = MobileNet(weights='imagenet',
include_top=False,
input_shape=(height,width,3))
for layer in mobilenet.layers:
layer.trainable = False
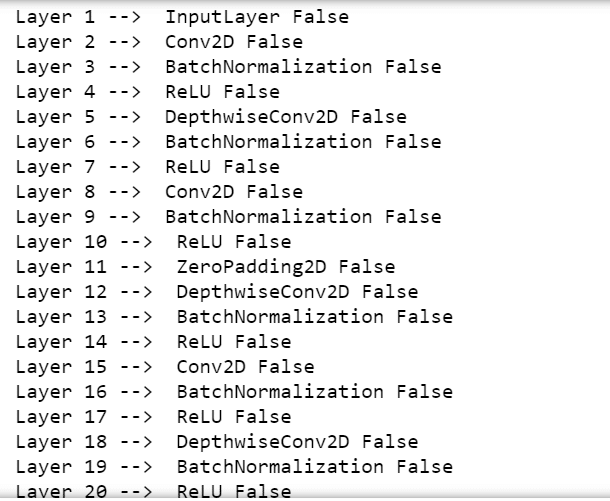
for i,layers in enumerate(mobilenet.layers):
print(f'Layer {i+1} --> ',layers.__class__.__name__,layers.trainable)
- Declaring the height and width of the images.
- Declaring Mobilenet with Imagenet weights, the top is not included.
- Non-inclusion of the top means that the fully connected layers in the last parts of the real Mobilenet model are not loaded here. We will make and train our own Fully connected layers.
- We are setting the trainable parameter of the layers to be False because we don’t want to change the imagenet weights.
- The last step is just printing layers’ names and their trainable parameter.
- Without a top, there will be 86 layers as shown below. The image below just shows 20 layers but actually, there are 86 layers like this.
Step 3 – Creating a top model for the Monkey Breed Classification model.
def add_top_layers_to_MobileNet(bottom_model,num_classes):
    top_model = bottom_model.output
    top_model = GlobalAveragePooling2D()(top_model)
    top_model = Dense(1024,activation='relu')(top_model)
    top_model = Dense(1024,activation='relu')(top_model)
    top_model = Dense(512,activation='relu')(top_model)
    top_model = Dense(num_classes,activation='softmax')(top_model)
    return top_model
- This step creates the head of the model that will be placed upon the bottom model(imported mobilenet model with 86 layers).
- We are saying it’s head but it is not actually the head as it is being joined after the 86 layers as we saw above.
- These are simply our Fully connected layers which will be mainly trained according to our classification use case.
- Line 2 – First of all we are taking the output of the mobilenet layers.
- Line 3 – Then we are adding a GlobalAveragePooling2D layer which will take the average of all the values in a single filter.
- Line 4-6 – We are adding 3 Fully connected layers or Dense layers with 1024, 1024, and 512 nodes respectively with relu activation in all of them.
- Line 7 – Finally a last Dense layer with 10 nodes. We have used 10 nodes here because our data has 10 classes of monkeys.
- Line 8 – Finally returning the model.
Step 4 – Join the bottom and top models.
self_made_layers = add_top_layers_to_MobileNet(mobilenet,10)
model = Model(inputs = mobilenet.input , outputs = self_made_layers)
model.compile(loss='categorical_crossentropy',
optimizer=RMSprop(learning_rate=0.001),
metrics=['accuracy'])
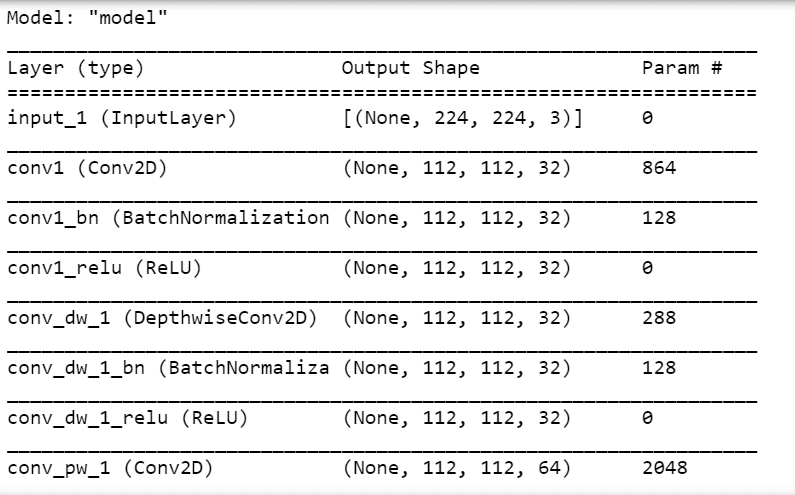
print(model.summary())
- Line 1 – We are getting the top model we build above.
- Line 2 – Joining both models.
- Then simply compile our model and print the summary of the model.
- The summary is way longer than this, but due to image constraints, I can show you only this much.
Step 5 – Instantiate ImageDataGenerators for augmenting the data.
train_dir = 'monkey_breed\\train'
validation_dir = 'monkey_breed\\validation'

train_gen = ImageDataGenerator(rescale=1./255,
                              rotation_range=45,
                              height_shift_range=0.3,
                              width_shift_range=0.3,
                              horizontal_flip=True,
                              fill_mode='nearest')

validation_gen = ImageDataGenerator(rescale=1./255)
- Instantiating ImageDataGenerator for training and validation for augmenting the data.
Step 6 – Augmenting the data for Monkey Breed Classification.
training_data = train_gen.flow_from_directory(train_dir,
                                                       batch_size=1,
                                                       shuffle=True,
                                                       class_mode='categorical',
                                                       target_size=(rows,columns))

valiadtion_data = validation_gen.flow_from_directory(validation_dir,
                                                       batch_size=1,
                                                       shuffle=False,
                                                       class_mode='categorical',
                                                       target_size=(rows,columns))

Step 7 – Creating callbacks for the Monkey Breed Classification model.
checkpoint = ModelCheckpoint('model/monkey_breed_MobileNet_V1.h5',
                             verbose=1,
                             mode='min',
                             monitor='val_loss',
                             save_best_only=True)

earlystopping = EarlyStopping(verbose=1,
                              monitor='val_loss',
                              restore_best_weights=True,
                              patience=3,
                              min_delta=0)

callbacks = [earlystopping,checkpoint]
- The checkpoint will always save the best model.
- Here best means the model with minimum val_loss.
- EarlyStopping will stop our training if val_loss is not decreasing even after 3 epochs.
Step 8 – Declare some constants.
train_samples = 1098
validation_samples = 272
epochs = 5
batch_size = 1
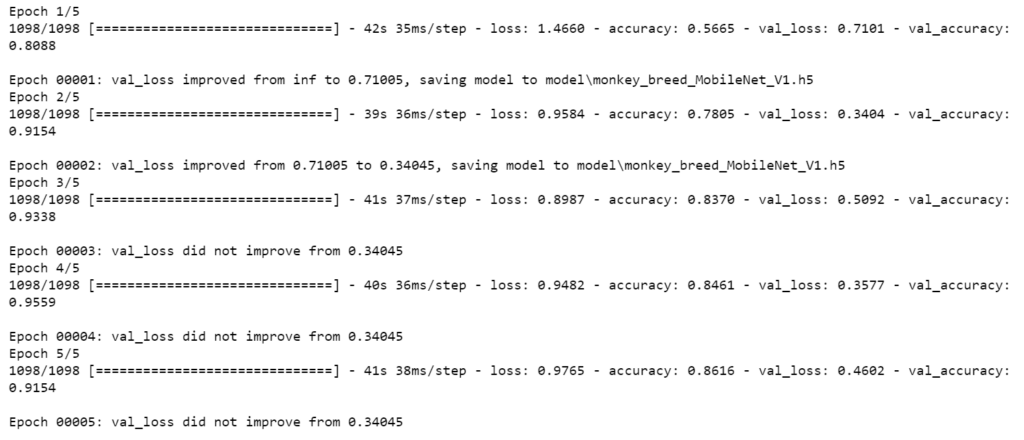
Step 9 – Finally train the model for Monkey Breed Classification.
history = model.fit(training_data,
                   epochs=epochs,
                   steps_per_epoch=train_samples//batch_size,
                   validation_data=valiadtion_data,
                   callbacks=callbacks,
                   validation_steps=validation_samples//batch_size)
Step 10 – Live prediction on 10 random images.
import os
import cv2
import numpy as np
import random
from keras.models import load_model

model = load_model('model\\monkey_breed_MobileNet_V1.h5')
acc=[]
monkey_breed_dict={'[0]':'mantled_howler',
                   '[1]':'patas_monkey',
                   '[2]':'bald_uakari',
                   '[3]':'japanese_macaque',
                   '[4]':'pygmy_marmoset',
                   '[5]':'white_headed_capuchin',
                   '[6]':'silvery_marmoset',
                   '[7]':'common_squirrel_monkey',
                   '[8]':'black_headed_night_monkey',
                   '[9]':'nilgiri_langur'}

for i in range(10):
    monkey_class = np.random.randint(0,9)
    all_class_list    = os.listdir('monkey_breed\\validation')
    select_one_class = all_class_list[monkey_class]
    pick_one_pic = random.choice(os.listdir('monkey_breed\\validation\\'+str(select_one_class)+'\\'))
    org_img = cv2.imread('monkey_breed\\validation\\'+str(select_one_class)+'\\'+pick_one_pic)
    org_img = cv2.resize(org_img,None,fx=0.5,fy=0.5,interpolation=cv2.INTER_AREA)

    img = org_img.copy()
    show_img = org_img.copy()

    show_img = cv2.resize(show_img,(500,500),interpolation=cv2.INTER_LINEAR)

    img = cv2.resize(img,(224,224),interpolation=cv2.INTER_LINEAR)
    img = img/255
    img = img.reshape(1,224,224,3)

    true = monkey_breed_dict[str([monkey_class])]
    predicted = monkey_breed_dict[str([np.argmax(model.predict(img,1,verbose=0))])]

    cv2.putText(show_img,'true - '+true,(10,40),cv2.FONT_HERSHEY_SIMPLEX,0.8,(255,255,255),2)
    cv2.putText(show_img,'predicted - '+predicted,(10,60),cv2.FONT_HERSHEY_SIMPLEX,0.8,(255,255,255),2)

    cv2.imshow('random img',show_img)


    acc.append(np.equal(monkey_class,np.argmax(model.predict(img,1,verbose=0))))
    cv2.waitKey(0)

cv2.destroyAllWindows()
print('\n')
print('Accuracy ---> ',str(round(np.mean(acc)*100,2))+' %')
- Here we are just randomly picking up 10 images from validation folder and predicting its classes.
- We are getting the accuracy of around 80% and 90% every time.
Download Source Code…
Download Data…
NOTE – When you will download the data from this link you will see 2 folders train and validation. Inside the train, there will be again a folder named train and the same for validation. Do one thing. Cut out this inner train folder and bring that out in the monkey_breed folder. Do the same for the validation folder.
- The previous folder hierarchy for the train would be like: monkey_breed -> train -> train -> all images
- Do it like: monkey_breed -> train -> all_images
- Do the same for the validation folder.
- Also if you want the pre-trained model of Monkey Breed Classification, contact me.
Do let me know if there’s any query regarding Monkey Breed Classification by contacting me on email or LinkedIn.
So this is all for this blog folks, thanks for reading it and I hope you are taking something with you after reading this and till the next time ?…
Read my previous post: AGE DETECTION USING CNN WITH KERAS
Check out my other machine learning projects, deep learning projects, computer vision projects, NLP projects, Flask projects at machinelearningprojects.net.