When starting with Machine Learning, MNIST Handwritten number recognition comes as the first project in everyone’s mind because of its simplicity, abundant data, and magical results. It can also be thought of as the ‘Hello World of ML world.
So, In today’s blog, we will see how to implement it. You might be thinking, everyone has made a tutorial on it, so what’s special in this one? The special thing in my project is that I have also made a live interactive predictor at the end, where you will draw the number and our trained model will predict it. So without any further due, Let’s do it…
Step 1 – Import all the required libraries.
import cv2
import numpy as np
import matplotlib.pyplot as plt
from tensorflow.keras.models import load_model
from keras.datasets import mnist
from tensorflow.keras.models import Sequential
from tensorflow.keras.layers import Conv2D,Flatten,Dropout,Dense,MaxPooling2D
from tensorflow.keras.optimizers import SGD
from keras.utils import np_utils

%matplotlib inline
Step 2 – Import training and testing data.
(train_X,train_y),(test_X,test_y) = mnist.load_data()
train_X.shape

Step 3 – Here we are just randomly visualizing our 28X28 images.
plt.imshow(train_X[1],cmap='gray')

train_y
Let’s see how train_y looks. train_y contains exact numbers written in the image. Like the image on index 1 is shown above and the number on the 1st index in train_y is 0. But we can.t give data in this format to our data, we need to one-hot encode it.

Step 4 – Preprocess our training and testing data.
train_X = train_X.reshape(-1,28,28,1)
test_X  = test_X.reshape(-1,28,28,1)

train_X = train_X.astype('float32')
test_X  = test_X.astype('float32')

train_X = train_X/255
test_X  = test_X/255

train_y = np_utils.to_categorical(train_y)
test_y  = np_utils.to_categorical(test_y)
- Line 1-2 – Our input shape was (60000,28,28), but Keras wants the data in (60000,28,28,1) format, that’s why we are reshaping it.
- Line 4-5 – We are converting the integer labels to floats, like the element at 1st index was 1 which is an int , now it will be 1.0 which is a float.
- Line 7-8 – We are normalizing our image, as we know our grayscale image is just a 2D image with all values ranging from 0-255, that’s why we are diving this image/2D matrix by 255 to bring everything in range 0-1.
- Line 10-11 – One Hot encode the labels. Previously at 1st index, we had 1 but now a 10-element array will be there which is [1,0,0,0,0,0,0,0,0,0] where 1 depicts the presence of that number. 1 is present at the 0 index means this array represents the number 0. This whole thing is shown below.
train_y[1]

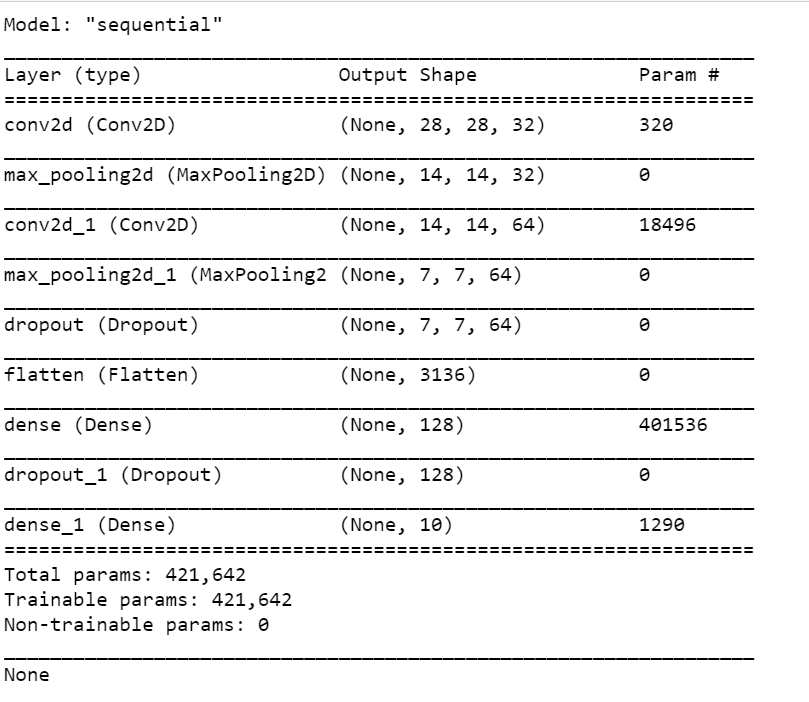
Step 5 – Let’s create our CNN model for MNIST Handwritten number recognition.
model = Sequential()

model.add(Conv2D(32, kernel_size=(3,3), activation='relu',input_shape=(28,28,1), padding='SAME'))
model.add(MaxPooling2D(pool_size=(2,2)))

model.add(Conv2D(64,(3,3),activation='relu',padding='SAME'))
model.add(MaxPooling2D(pool_size=(2,2)))
model.add(Dropout(0.25))

model.add(Flatten())
model.add(Dense(128,activation='relu'))
model.add(Dropout(0.5))

model.add(Dense(10,activation='softmax'))

model.compile(loss='categorical_crossentropy', optimizer=SGD(0.01), metrics=['accuracy'])

print(model.summary())
- Line 1 – Let’s create a new Sequential model and call it model.
- Line 3 – Let’s add a 2D convolution layer with 32 filters, kernel size of 3X3, activation function set to ReLU, input shape of 28X28X1 (shape of our mnist images), and padding set to SAME.
- Line 4 – Let’s add a MaxPooling layer with pool size of 2X2.
- Line 6-7 – Let’s add one more set of Conv and Max pool.
- Line 8 – We are adding a Dropout layer, which will help us in preventing Overfitting.
- Line 10 – Let’s flatten these 2D results.
- Line 11-12 – Add a Dense layer(a simple layer with n neurons in it), with 128 neurons in it and activation set to ReLU. Add a Dropout layer.
- Line 14 – Last layer with 10 neurons in it, with softmax activation. Softmax works best with multilabel classification. It will give the highest probability to that neuron which will be at the index of the image provided. Like if the image provided is of 5, the output could be something like [0.001, 0.0003, 0.0, 0.0, 0.99, 0.008, 0.00065, 0.0, 0.0, 0.0]
Step 6 -Let’s train our MNIST Handwritten number recognition model.
batch_size=32
epochs=10

plotting_data = model.fit(train_X,
                          train_y,
                          batch_size=batch_size,
                          epochs=epochs,
                          verbose=1,
                          validation_data=(test_X,test_y))

loss,accuracy = model.evaluate(test_X,test_y,verbose=0)

print('Test loss ---> ',str(round(loss*100,2)) +str('%'))
print('Test accuracy ---> ',str(round(accuracy*100,2)) +str('%'))
- Simply just train the model using model.fit().
- Use model.evaluate() to evaluate loss and accuracy and finally print it.

Step 7 – Plot the results for the MNIST Handwritten number recognition model.
plotting_data_dict = plotting_data.history

test_loss = plotting_data_dict['val_loss']
training_loss = plotting_data_dict['loss']
test_accuracy = plotting_data_dict['val_accuracy']
training_accuracy = plotting_data_dict['accuracy']

epochs = range(1,len(test_loss)+1)

plt.plot(epochs,test_loss,marker='X',label='test_loss')
plt.plot(epochs,training_loss,marker='X',label='training_loss')
plt.legend()
- In plotting_data we stored some data while using model.fit().
- So we can use the history attribute of that plotting_data to get a dictionary object which had loss and accuracy values stored in it while training.

plt.plot(epochs,test_accuracy,marker='X',label='test_accuracy')
plt.plot(epochs,training_accuracy,marker='X',label='training_accuracy')
plt.legend()

Step 8 – Saving our model for future use.
model.save('MNIST_10_epochs')
print('Model Saved !!!')
NOTE – Use the statement below to load the saved model anywhere and use it.
classifier = load_model('MNIST_10_epochs.h5')
Step 9 – Live predictions for MNIST Handwritten number recognition.
drawing=False
cv2.namedWindow('win')
black_image = np.zeros((256,256,3),np.uint8)
ix,iy=-1,-1

def draw_circles(event,x,y,flags,param):
    global ix,iy,drawing
    if event== cv2.EVENT_LBUTTONDOWN:
        drawing=True
        ix,iy=x,y

    elif event==cv2.EVENT_MOUSEMOVE:
        if drawing==True:
            cv2.circle(black_image,(x,y),5,(255,255,255),-1)

    elif event==cv2.EVENT_LBUTTONUP:
        drawing = False

cv2.setMouseCallback('win',draw_circles)

while True:
    cv2.imshow('win',black_image)
    if cv2.waitKey(1)==27:
        break
    elif cv2.waitKey(1)==13:
        input_img = cv2.resize(black_image,(28,28))
        input_img = cv2.cvtColor(input_img,cv2.COLOR_BGR2GRAY)
        input_img = input_img.reshape(1,28,28,1)
        res = classifier.predict_classes(input_img,1,verbose=0)[0]
        cv2.putText(black_image,text=str(res),org=(205,30),fontFace=cv2.FONT_HERSHEY_SIMPLEX,fontScale=1,color=(255,255,255),thickness=2)
    elif cv2.waitKey(1)==ord('c'):
        black_image = np.zeros((256,256,3),np.uint8)
        ix,iy=-1,-1
cv2.destroyAllWindows()
Line 1-19 – Refer to my HOW TO DRAW BASIC SHAPES ON IMAGES IN PYTHON USING OPENCV blog to understand how we are drawing number.
- Line 23-24 – If we hit the ESC key, break the code.
- Line 25-30 – after drawing if we hit ENTER key, perform preprocessings and use our pre-trained model to predict the number.
- Line 31-33 – If someone hits ‘C’ key, clear the screen.
Final Results…
Download Source Code…
Do let me know if there’s any query regarding MNIST Handwritten number recognition by contacting me on email or LinkedIn.
So this is all for this blog folks, thanks for reading it and I hope you are taking something with you after reading this and till the next time …
Check out my other machine learning projects, deep learning projects, computer vision projects, NLP projects, Flask projects at machinelearningprojects.net.