So guys in today’s blog we will see how can we perform Object Detection using SSD in the simplest way possible. SSDs are very fast in Object Detection when compared to those big boys like R-CNN or Fast R-CNN, etc.
This is going to be a very fun project with endless use cases. So without any further due, Let’s do it…
Create a conda environment and install the required libraries
conda create -n od python=3.9
conda activate od
pip install opencv-python numpy imutils
Code for Object Detection using SSD…
from imutils.video import FPS
import numpy as np
import imutils
import cv2


use_gpu = True
live_video = False
confidence_level = 0.5
fps = FPS().start()
ret = True
CLASSES = ["background", "aeroplane", "bicycle", "bird", "boat",
           "bottle", "bus", "car", "cat", "chair", "cow", "diningtable",
           "dog", "horse", "motorbike", "person", "pottedplant", "sheep",
           "sofa", "train", "tvmonitor"]

COLORS = np.random.uniform(0, 255, size=(len(CLASSES), 3))

net = cv2.dnn.readNetFromCaffe('ssd_files/MobileNetSSD_deploy.prototxt', 'ssd_files/MobileNetSSD_deploy.caffemodel')

if use_gpu:
    print("[INFO] setting preferable backend and target to CUDA...")
    net.setPreferableBackend(cv2.dnn.DNN_BACKEND_CUDA)
    net.setPreferableTarget(cv2.dnn.DNN_TARGET_CUDA)


print("[INFO] accessing video stream...")
if live_video:
    vs = cv2.VideoCapture(0)
else:
    vs = cv2.VideoCapture('test.mp4')

while ret:
    ret, frame = vs.read()
    if ret:
        frame = imutils.resize(frame, width=400)
        (h, w) = frame.shape[:2]

        blob = cv2.dnn.blobFromImage(frame, 0.007843, (300, 300), 127.5)
        net.setInput(blob)
        detections = net.forward()

        for i in np.arange(0, detections.shape[2]):
            confidence = detections[0, 0, i, 2]
            if confidence > confidence_level:
                idx = int(detections[0, 0, i, 1])
                box = detections[0, 0, i, 3:7] * np.array([w, h, w, h])
                (startX, startY, endX, endY) = box.astype("int")

                label = "{}: {:.2f}%".format(CLASSES[idx], confidence * 100)
                cv2.rectangle(frame, (startX, startY), (endX, endY), COLORS[idx], 2)

                y = startY - 15 if startY - 15 > 15 else startY + 15
                cv2.putText(frame, label, (startX, y), cv2.FONT_HERSHEY_SIMPLEX, 0.5, COLORS[idx], 2)

        cv2.imshow('Live detection',frame)

        if cv2.waitKey(1)==27:
            break

        fps.update()

fps.stop()

print("[INFO] elasped time: {:.2f}".format(fps.elapsed()))
print("[INFO] approx. FPS: {:.2f}".format(fps.fps()))
- Line 1-5 – Importing libraries required for Object Detection using SSD.
- Line 7-15 – Defining some constants and Classes array. Our SSD model is trained on these 21 classes.
- Line 17 – Defining colors array where each class is randomly assigned a color.
- Line 19 – Reading the network in a variable called net using cv2.dnn.readNetFromCaffe.
- Line 21-24 – If the parameter use_gpu is set to TRUE, set the backend and target to Cuda.
- Line 27-31 – Initialize the VideoCapture object either with 0 for live video or with the video file name.
- Line 34 – Let’s get in the infinite array and read the frames.
- Line 35 – If ret says that if the VideoCapture object is returning True, then only proceed.
- Line 36-37 – Resize the frame and get its height and width.
- Line 39-41 – Create a blob from the image, set it as input, and pass it forward through the network using cv2.blobFromImage.
- Line 43 – Let’s traverse in the detections we got.
- Line 44 – Let’s check the confidence of each and every detection.
- Line 45 – If the confidence is greater than a threshold then proceed.
- Line 47-48 – Calculate the coordinates of the box and convert them to int.
- Line 50 – Creating text like ‘Class_name: confidence%’.
- Line 51 – Drawing the rectangle around the found object.
- Line 53-54 – Finally putting this label onto the original frame.
- Line 56 – Show final results.
- Line 58-59 – Break if someone hits the ESC key.
- Line 61 – Update the fps counter.
- Line 63 – Stop the fps counter.
- Line 65-66 – Printing FPS metrics.

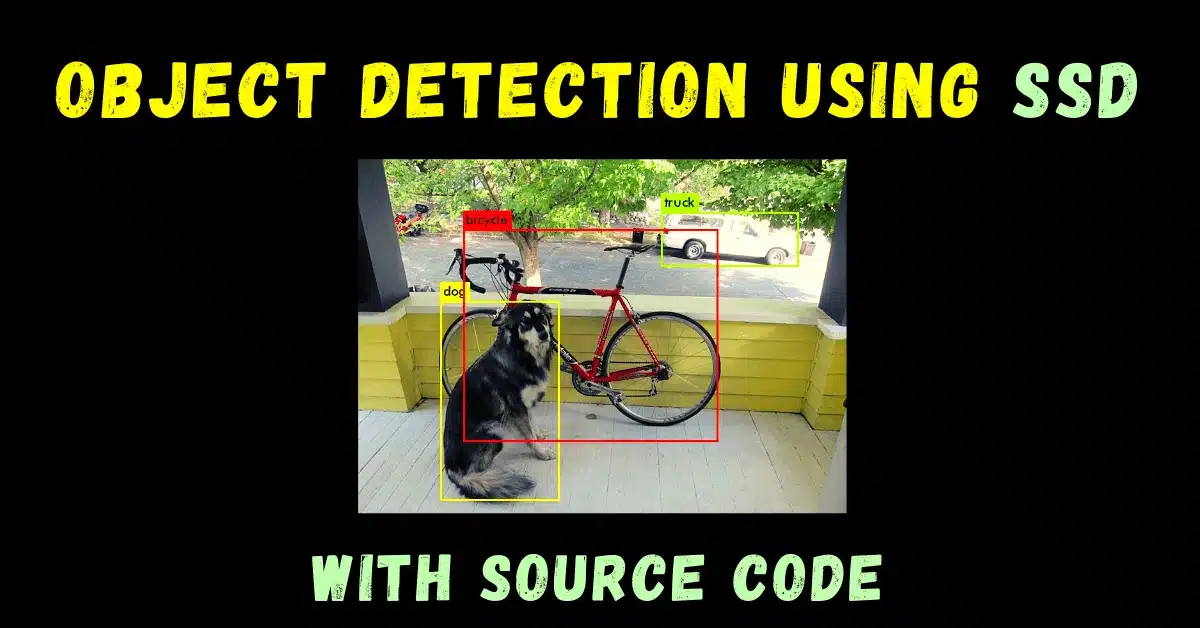
NOTE – You will see some results like these after the successful execution of the code. I am using GPU that’s why FPS is quite high but if you are not using GPU, you might see lower FPS.
Download files for Object Detection using SSD…
Do let me know if there’s any query regarding Object Detection using SSD by contacting me on email or LinkedIn.
So this is all for this blog folks, thanks for reading it and I hope you are taking something with you after reading this and till the next time ?…
Read my previous post: SOCIAL DISTANCING USING YOLOV3
Check out my other machine learning projects, deep learning projects, computer vision projects, NLP projects, Flask projects at machinelearningprojects.net.
Hi Abhishek,
I have a question and hope you can help me on this.
I copied the source code and tried executing — returns this error
File “C:\Users\Professional\Coding Files\object_detection.py”, line 25, in
net = cv2.dnn.readNetFromCaffe(‘ssd_files/MobileNetSSD_deploy.prototxt’, ‘ssd_files/MobileNetSSD_deploy.caffemodel’)
cv2.error: OpenCV(4.7.0) D:\a\opencv-python\opencv-python\opencv\modules\dnn\src\caffe\caffe_io.cpp:1126: error: (-2:Unspecified error) FAILED: fs.is_open(). Can’t open “ssd_files/MobileNetSSD_deploy.prototxt” in function ‘cv::dnn::ReadProtoFromTextFile’
Tried troubleshooting and going to Stack Overflow — no solution. Would appreciate your inputs if you can help out.
P.S. Great project by the way
Try uninstalling and reinstalling opencv…
Do the following steps in terminal:
pip uninstall opencv-python
pip install opencv-python
Hi Abhishek, how are you?
I’ve been testing the code and it works great, but I haven’t been able to train a model correctly. I wanted to see if you could give me some kind of paid consultancy so I could make my own trained model for SSD models.
We are in contact, have a good day, greetings and thank you very much.
I have a question. Does it save the objects detected in a database of a file?
No, not till now, but you can do that…