So one more basic and one of the most important operations one needs to perform while playing with images in OpenCV is resizing.
In this very short blog, we will see that how we can resize an image in two ways using the resize function of the cv2 library.
This is going to be a very interesting blog, so without any further due, Let’s do it…
Checkout the video here – https://youtu.be/26-2A69BPow
Step 1 – Let’s import the libraries required to resize an image.
import cv2
import matplotlib.pyplot as plt
Step 2 – Now let’s import the input image.
path='test.tiff'
img = cv2.imread(path)
We have our image in the img variable now.
Step 3 – Let’s check the size of the image.
print(img.shape)

Note – We use .shape for checking the size of any image.
Step 4 – Let’s resize the image
Syntax – cv2.resize(src, dsize[, dst[, fx[, fy[, interpolation]]]])
| src | [required] source/input image |
| dsize | [required] desired size for the output image |
| fx | [optional] scale factor along the horizontal axis |
| fy | [optional] scale factor along the vertical axis |
| interpolation | [optional] flag that takes one of the following methods. INTER_NEAREST – a nearest-neighbor interpolation INTER_LINEAR – a bilinear interpolation (used by default) INTER_AREA – resampling using pixel area relation. It may be a preferred method for image decimation, as it gives moire’-free results. But when the image is zoomed, it is similar to the INTER_NEAREST method. INTER_CUBIC – a bicubic interpolation over 4×4 pixel neighborhood INTER_LANCZOS4 – a Lanczos interpolation over 8×8 pixel neighborhood |
- The first way is directly passing the dsize argument as (required width, required height) and not passing fx,fy .
- The second way is that we can pass dsize as None and pass fx and fy as (scale factor for width) and (scale factor for height) for scaling the image in the horizontal axis and vertical axis respectively.
resized_img_1st_way = cv2.resize(img,(200,100),interpolation=cv2.INTER_AREA)
resized_img_2nd_way = cv2.resize(img,None,fx=0.3,fy=0.4,interpolation=cv2.INTER_AREA)
NOTE – Read more about cv2.resize.
Step 5 – Finally let’s check the size of our images.
print('Size of original image -> ',img.shape)
print('Size after resizing using 1st way -> ',resized_img_1st_way.shape)
print('Size after resizing using 2nd way -> ',resized_img_2nd_way.shape)

Note – Here 3 is the no. of channels i.e. RGB.
Let’s see the whole code…
import cv2
import matplotlib.pyplot as plt

path='test.tif'
img = cv2.imread(path)

print(img.shape)
# resize an image
resized_img_1st_way = cv2.resize(img,(200,100),interpolation=cv2.INTER_AREA)
resized_img_2nd_way = cv2.resize(img,None,fx=0.3,fy=0.4,interpolation=cv2.INTER_AREA)

print('Size of original image -> ',img.shape)
print('Size after resizing using 1st way -> ',resized_img_1st_way.shape)
print('Size after resizing using 2nd way -> ',resized_img_2nd_way.shape)

# Plotting our results in one place
plt.figure(figsize=(12,8))

plt.subplot(131)
plt.imshow(img)
plt.title('Original Image')

plt.subplot(132)
plt.imshow(resized_img_1st_way)
plt.title('Resized using 1st way')

plt.subplot(133)
plt.imshow(resized_img_2nd_way)
plt.title('Resized using 2nd way')

plt.show()
plt.tight_layout()
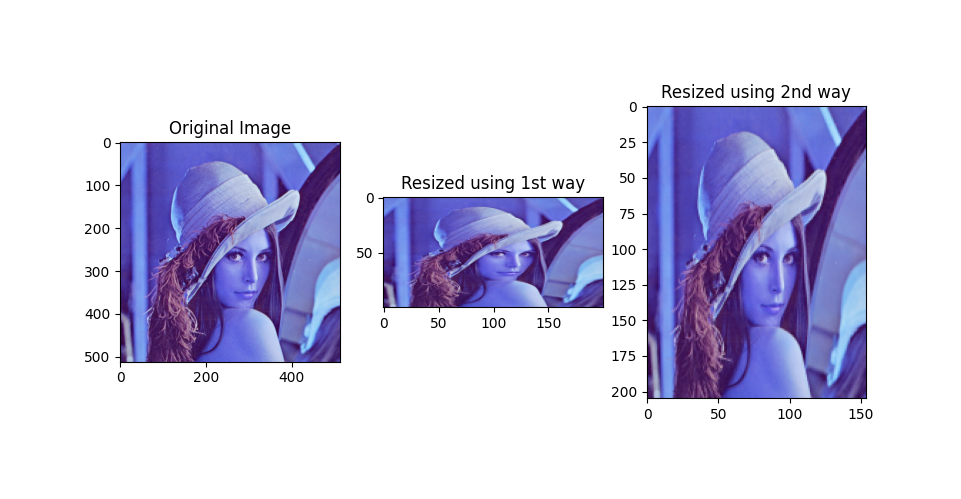
- 1st image is the original image.
- In the 2nd image, the size went down to 200X100 where 200 is the width and 100 is the height.
- And in the 3rd image width became (width*0.3) and height became (height*0.4) = (512*0.3) and (512*0.4)
- So the final width is 154 and the height is 205 using the 2nd way.
Do let me know if there’s any query regarding how to resize an image by contacting me on email or LinkedIn.
So this is all for this blog folks, thanks for reading it and I hope you are taking something with you after reading this and till the next time ?…
Read my previous post: HOW TO READ AN IMAGE IN PYTHON USING OPENCV
Check out my other machine learning projects, deep learning projects, computer vision projects, NLP projects, Flask projects at machinelearningprojects.net.